 Click here
(Also known as Wappy Spring and Lindley Moor Quarry)
Grid reference SE102188
If you grab the N on the compass in the top left of the map and spin it round to the bottom you get a better view of the crag.
The often ignored Lindley Moor Edge has a small collection of routes and a number of low grade boulder problems strung out along a peaceful hill side with fantastic views over the Calder Valley. It's very easily accessible from the M62 and Huddersfield and once even had it's own dedicated, but possibly inaccurately named, guidebook "T' Nearest Crag T' College'. A more recent mention in the fine YMC Yorkshire Gritstone Volume 2 has resulted in a bit more attention.
Original route/problem names from the Huddersfield Area Bouldering Guide and "T' Nearest Crag T' College' have been retained where possible although we are taking the left to right as you look at the crag approach to ordering the problems.
This is the most definitive guide so far, combining the all the recorded boulder problems and routes.
There are a load of route numbers painted on to the rocks that would appear to refer to older routes, however these are no longer documented and no-one know their origin. If anyone has any information on this we'd appreciate you getting in touch.
ACCESS
Getting to Lindley Moor Edge is easy, near the Wappy Spring pub on the A643 Lindley Moor Road there is a minor road running under a motorway bridge, go down this and carry on to the limited parking on Old Lindley Rood in small lay bys where you can walk directly up to the crag.
A better option might be to take a left after going under the bridge and head up the rough track towards the cricket club, park up just past it and walk across the scrub land to the bench next to the Sloping Top Boulder where you can descend easily to the crag.
![]() An easy to print PDF TOPO guide to all the problems and routes will be available soon.
An easy to print PDF TOPO guide to all the problems and routes will be available soon.
BETA ALERT!
Click on the camera icon ![]() to view images of the problems being climbed or click on the video icon
to view images of the problems being climbed or click on the video icon  to view videos of the problems being climbed.
The Problems & Routes
Hovering your mouse over, or clicking on, the name/grade of the problem/route will show the problem highlighted on the topo photograph below.
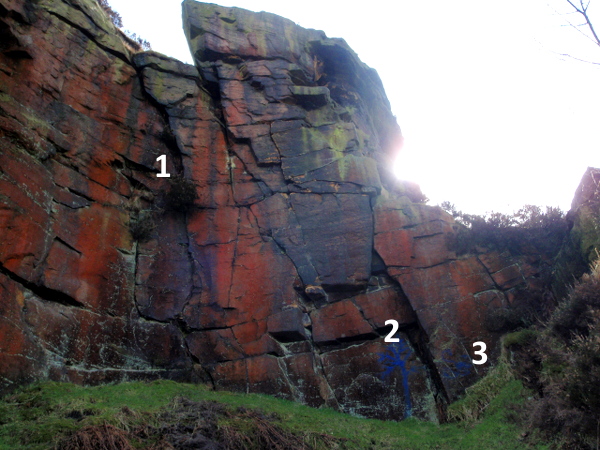
Sector A - Refuse Hollow
1) Refuse Hollow Route 1 HVS 5a Start up the crack and head for the overlap
2) Cracklet - Font 3 Head up the crack to the ledge
3) Slot Machine - Font 3+ The short wall just to the right of the previous problem
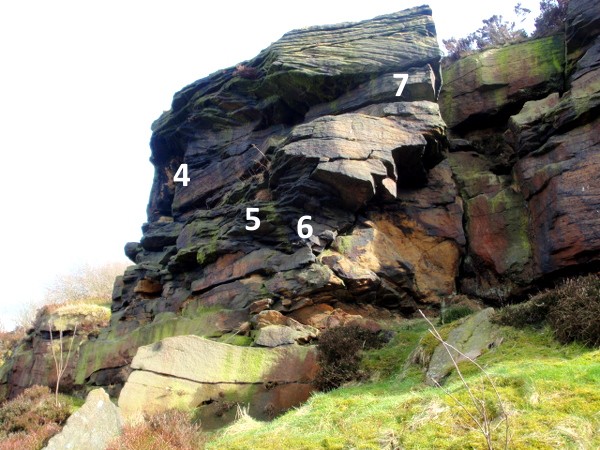
Sector B - Quarry Area
4) Exposure HVD Up and left from the ledge
5) Limpet Roof - Font 4+ / HVS Direct through the central overhang
6) Crab - Font 2+ Move under the roof to the right arete
7) Claw - Font 4+ Power your way up the overhanging arete, escaping either up or down the crack
8) Tan Thing VS The face past arête
9) Descent Mod The corner
10) Franco’s Riot HS 4a Climb the right arête on the front of buttress (a little left of topo line)
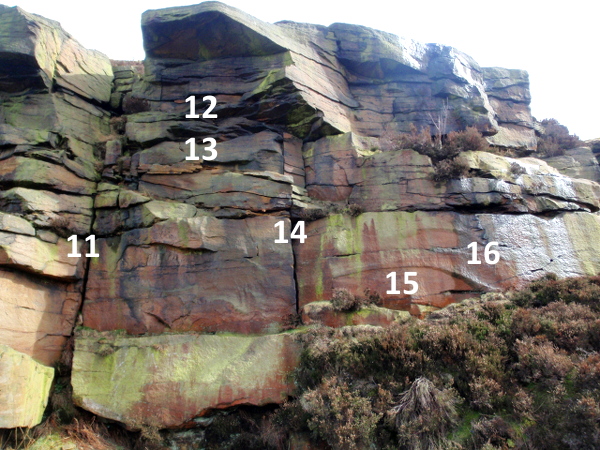
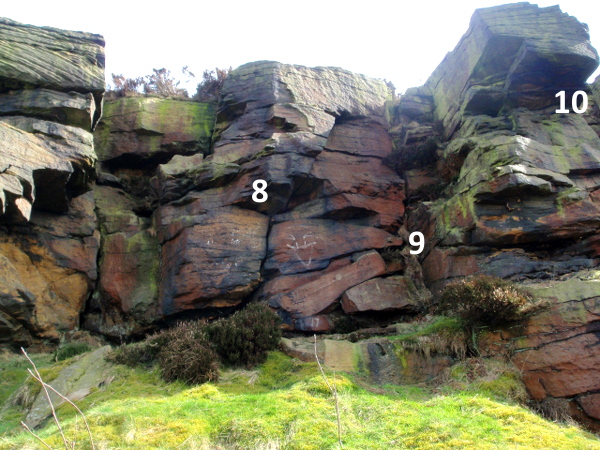
Sector C - Fornicator’s Wall
11) Fornicator's Wall Route 2 D Head up the obvious corner crack
12) Fornicator's Wall Route 3 HVS 5b The large overhang direct through the middle, look for the small undercut hold. Reachy
13) Fornicator’s 3a HS 4b Escapes left before roof
14) Fornicator's Wall Route 4 S 4b The crack up to the right hand side of the nose
15) Fornicator's Wall Route 5 HS 4b Up the slab into the top groove
16) Lindley Moor Quarry Problem 4 - Font 3 Up the slabby wall to a highball finish to the left of the large flake
17) Quarry Problems 5 - Font 5 Starting from the square arete make your way along the low break, once at the corner head up to the higher break and the sandy ledge, traverse back again
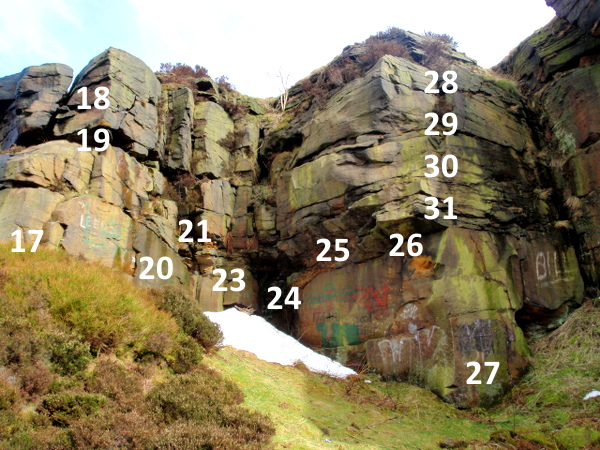
18) Fornicators Wall Route 6a D Up the lower groove to climb the upper arete
19) Fornicators Wall Route 6b D Start up the crack this time then head left to the upper arete
20) Skiver's Wall VS 5a Up the middle of the lower wall and the top side wall.
21) Fornicators Wall Route 7 S 4a From the corner head out left to the crack and up
Sector D - Bedstead Bay
22) The Girdle - VS 4c A traverse of the Bedstead Bay on the varying heights of the breaks. Topping out can be done in various places. Watch out for loose rock
23) Dyane's Last Visit VD The loose corner
24) Not A Lot VS 4c Bridge the crack on the overhang up to the crack, then exit right to the top
25) Lindley MoorQuarry Problem 6 - Font 5+ Up the wall to the left of the arete, escape to the left
26) Lindley Moor Quarry Problem 7 - Font 5+ The right side of the arete, escaping right this time
27) Bedstead Right - Font 4+ The wall to the right of the arete
28) Bedstead Bay Route 8d VS Direct up the overhangs
29) Bedstead Bay Route 8a HVS Left of the arete head upwards eliminating hold to the right of the arete and the obvious ledge to right.
30) Bedstead Bay Route 8b VS 4c Direct up the small wall to join the previous route
31) Bedstead Bay Route 8c HS 4c Starting from the crack to join the previous 2 routes
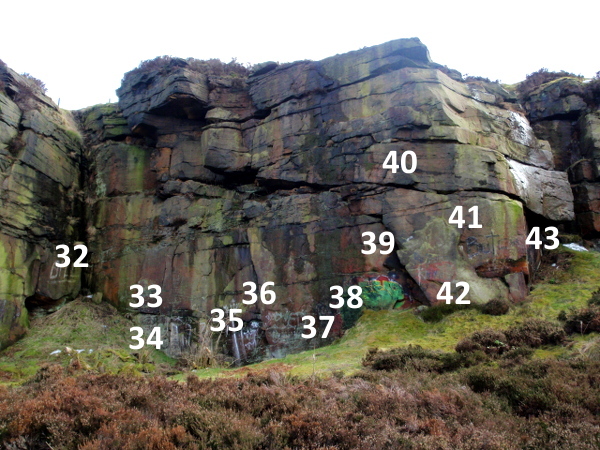
32) Booming Biltern 9a HS 4b Starting from the flake head up and the right to finish up the groove
33) Booming Biltern 9b HVS 4c From the twin cracks head up then finish up the groove.
34) Visions of the Emerald VS There is an alternative finish to Booming Biltern 9b where you head further right and finish up the open groove
35) Booming Biltern 9c VS 4c Start from the left leaning crack then finish up the groove
36) Rock Race HVS 4c Direct just right of Booming Biltern 9c
37) Booming Biltern 9d S Head up the wall to the traverse, make your way left to finish, again, up the groove
38) Booming Biltern 9e S Starting slightly further right again head up, then left to finish as for the other routes
39) Rock Walk VS 4c Steeply direct up from cracked recess
40) Rock Runner HS 4b Head up the flat part of the wall to the slight overhangs then head right to finish up the high slab
41) Lindley Moor Quarry Problem 8 - Font 5 Starting up the side wall traverse the break leftwards all the way to the dank corner
42) Lindley Moor Quarry Problem 9 - Font 4 Head up the wall to the break then move off right to escape
43) Rock Romp VS 4c The left arete from the gully

Sector E - West Wing
44) Breeze S 4a The arete starting from the flakes
45) Windy Grass HVD 4a Climb the corner
46) Windy Sue HVD 4a Start up the corner then move right to the arete
47) Sue's Solo HD Make your way up through the blocks to the upper slab and then the top
Sector F - Cave Boulder
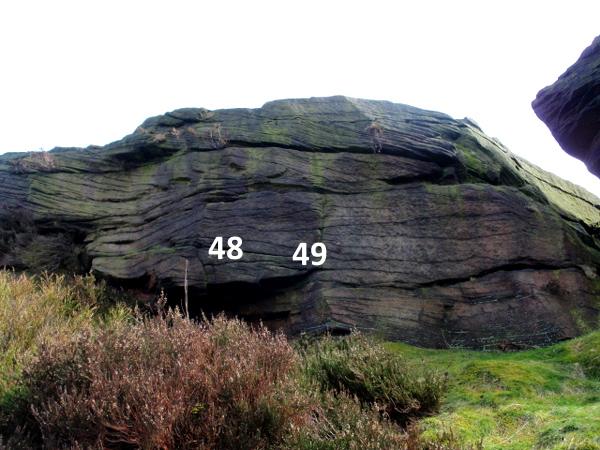
48) Green Slab & Cave Problem 13 - Font 3 The main part of the wall, loads of possible eliminates
49) Green Slab & Cave Problem 12 - Font 3 Climb the faint crack line
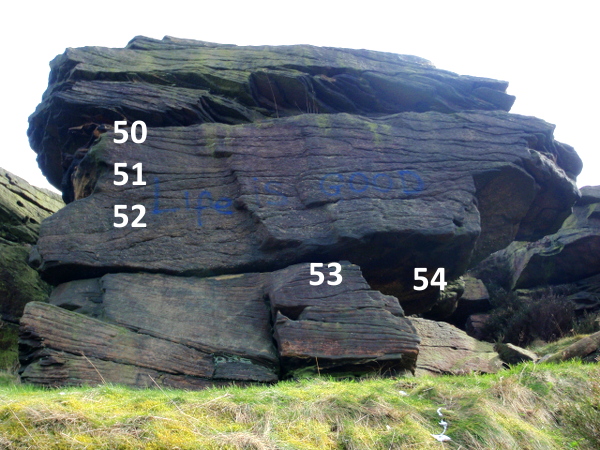
50) Cave Traverse - Font 5 Starting from the side wall, traverse the main face rightwards all the way to the block in the gully
51) Cave End - Font 3+ Up the flaky side wall, crux is at the top
52) Cave Arete - Font 3 Direct up the arete
53) Squares - Font 4+ Just left of the overhang, climb the face via the two square holds from a sitting start. Font 3 from standing.
54) Cave Right- Font 5+ From a sitting start in the cave move left to the lip and up the overhang
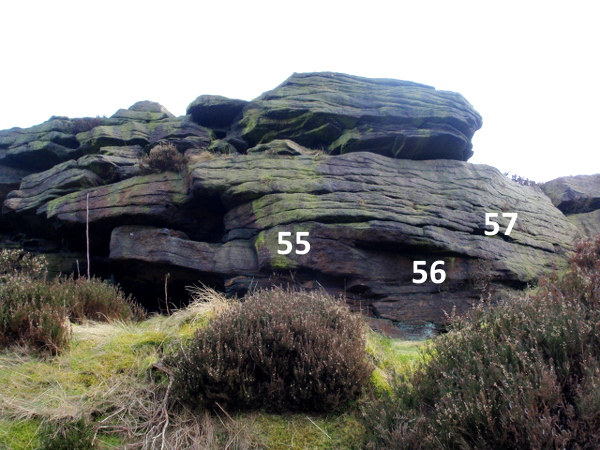
Sector G - Green Slab Buttress
55) Hanging Rib - Font 4+ 1m left of the round hole pull out of the corner from a sit start
56) Green Slab & Cave Problem 5 - Font 3 2m right of the round hole climb the wall
57) Green Slab & Cave Problem 4 - Font 3 Up the small wall and overhang
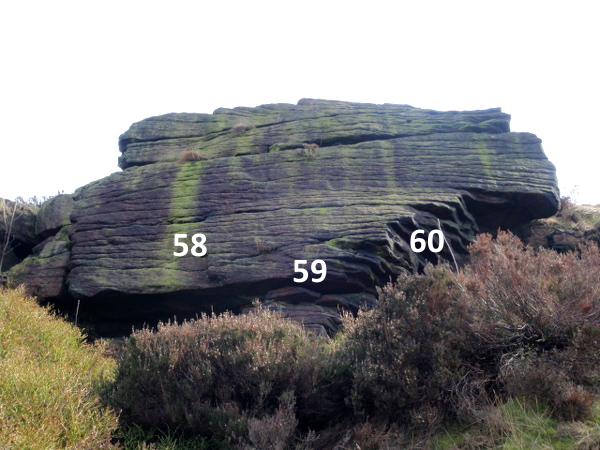
Green Slab
58) Green Slab & Cave Problem 3 - Font 4 1m right of the arete gain the slab using the two poor slopers then steady away to the top
59) Green Slab - Font 3+ The well travelled middle of the slab
60) Green Slab & Cave Problem 1 - Font 3 Climb the slab, watch out for the loose low block

Sector H - Sloping Top Boulder
61) Stone Steps Problem 13 - Font 3 The middle of the side wall
62) Stone Steps Problem 12 - Font 3 Climb the arete on the left hand side
63) Arete Right - Font 4+ Climb the arete on the Right hand side
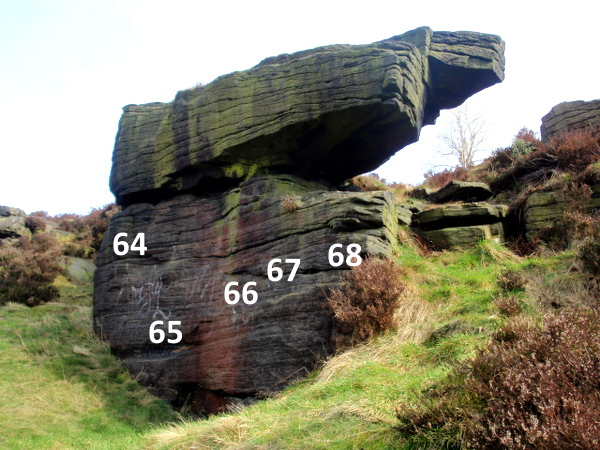
64) Stone Steps Problem 14 - Font 6a A traverse of the main face from left to right using the crimps and pockets (not the main break)
65) Stone Steps Problem 11 - Font 6b+ Climb the face via the sloper, the arete is not in at this grade
66) Pocket, Pinch and Jug - Font 5 The middle of the face
67) Stone Steps Problem 9 - Font 5 Get to the break from the round hole and hope you can reach the top
68) Stone Steps Problem 8 - Font 5 Climb the wall just left of the nose, the crux is pulling onto the top
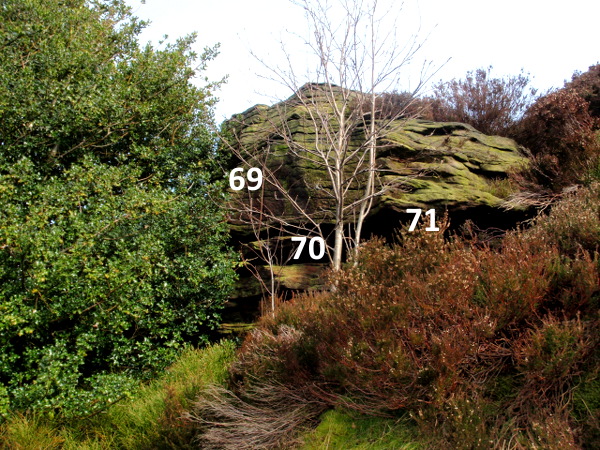
Sector I - Holly Tree Boulders
69) Scratch Back - Font 3 The middle of the side wall (behind the holly tree)
70) Stone Steps Problem 6 - Font 3 Up the easy wall
71) Stone Steps Problem 5 - Font 3 Climb the wall 1m left of the arete
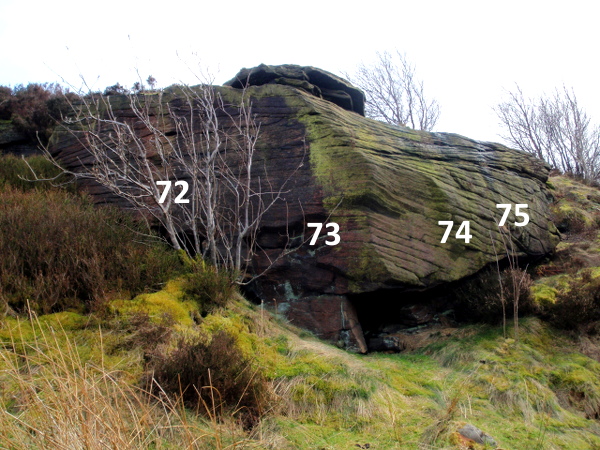
72) Stone Steps Problem 4 - Font 3 Up the face via the finger slots
73) Stone Steps Problem 3 - Font 4 Clamber up the overhanging nose
74) Stone Steps Problem 2 - Font 3 Climb the often green scoop
75) Stone Steps Problem 1 - Font 3 The side wall
Thanks to Alex for his help with the photographs and checking the route & problem lines.